Monday, September 28, 2015

Chocolate Zucchini Muffins

I missed the part where it was September. Yes, I've had my pumpkin spice latte. Yes, I've pulled out the sweaters. Yes, I noticed it's getting darker way earlier which makes me sad. But somehow, I woke up and realized it's almost October--OCTOBER?!?! I've got a stockpile of apple and pumpkin all ready to go but I can't quite commit to October treats just yet. Maybe next week.

To bridge the gap, I brought back Muffin Monday at work. Zucchini is still the love my summer life and I've made oodles of zoodles (mostly so I can say "oodles of zoodles" more often). When I was in Maine a couple weeks ago, my mom and I made a double batch of zucchini bread (so much zucchini bread). My mom usually makes it chocolate zucchini bread but this time, we did a nice half and half of regular and chocolate loaves.

Inspired by this epic baking session, I created these chocolate zucchini muffins as a way to have a healthy breakfast on the go. Instead of oil, we're using Greek yogurt. I also solidly believe the yogurt gives a better texture to breads and muffins. For good measure, we're also adding pecans--because we [pe]can! You know you love the puns.

 
A large zucchini is shredded onto a double layer of paper towels. You need to squeeze out that extra water from the vegetable before we make it into muffins. One bowl contains our zucchini, another contains our dry ingredients while the biggest bowl has the wet ingredients. Eggs, sugar and yogurt are whisked together before stirring in the dry ingredients. When I started this process, I wasn't going to make them chocolate so I added the cocoa powder after the fact. It worked out in the end.

 
Zucchini and pecans are added last, gently folded in to make sure you get a good bit in every bite. I baked these for about 30 minutes. Of course I ate one right away but without oil, they stick to the wrappers a bit until they are cooled. Tastes the same but you get less muffin for your buck until you let them set.

 
So what will Muffin Monday be next week, pumpkin? Apple? Banana? Decisions, decisions...

Recipe
adapted from Joy of Cooking
  • 1 1/2 cups of flour
  • 1/4 cup of unsweetened cocoa powder
  • 1 teaspoon baking soda
  • 1 teaspoon baking powder
  • 1/4 teaspoon cinnamon
  • 3/4 cup sugar
  • 2 eggs
  • 1/2 cup Greek yogurt
  • 1 teaspoon vanilla
  • 1/2 teaspoon salt
  • 2 cups grated zucchini, drained of excess liquid
  • 1/4 chopped pecans (optional)
  1. Preheat the oven to 350. Line a muffin tin with paper liners or grease with cooking spray.
  2. In a medium bowl, mix together the dry ingredients: flour, cocoa powder, baking soda, baking powder and cinnamon.
  3. In a large bowl, whisk the sugar, eggs, yogurt, vanilla and salt until creamy.
  4. Slowly stir the flour mixture into the egg-sugar mixture until incorporated.
  5. Fold in the zucchini and pecans (if desired) until evenly mixed.
  6. Fill muffin tins 3/4 of the way with batter.
  7. Bake for 30-40 minutes or until a toothpick placed in the center comes out clean. 
  8. Allow to cool before eating. 

Friday, September 4, 2015

Oatmeal S'mores Bars

If for some reason melted chocolate and marshmallows don't appeal to you, stick with this post anyways just for the life hack included. That's right, we're life-hacking butter, very important. Summer isn't complete without a s'more...or three. I successfully did the fire-building (okay, my brother did the fire building) and the marshmallow roasting and melty chocolate making.

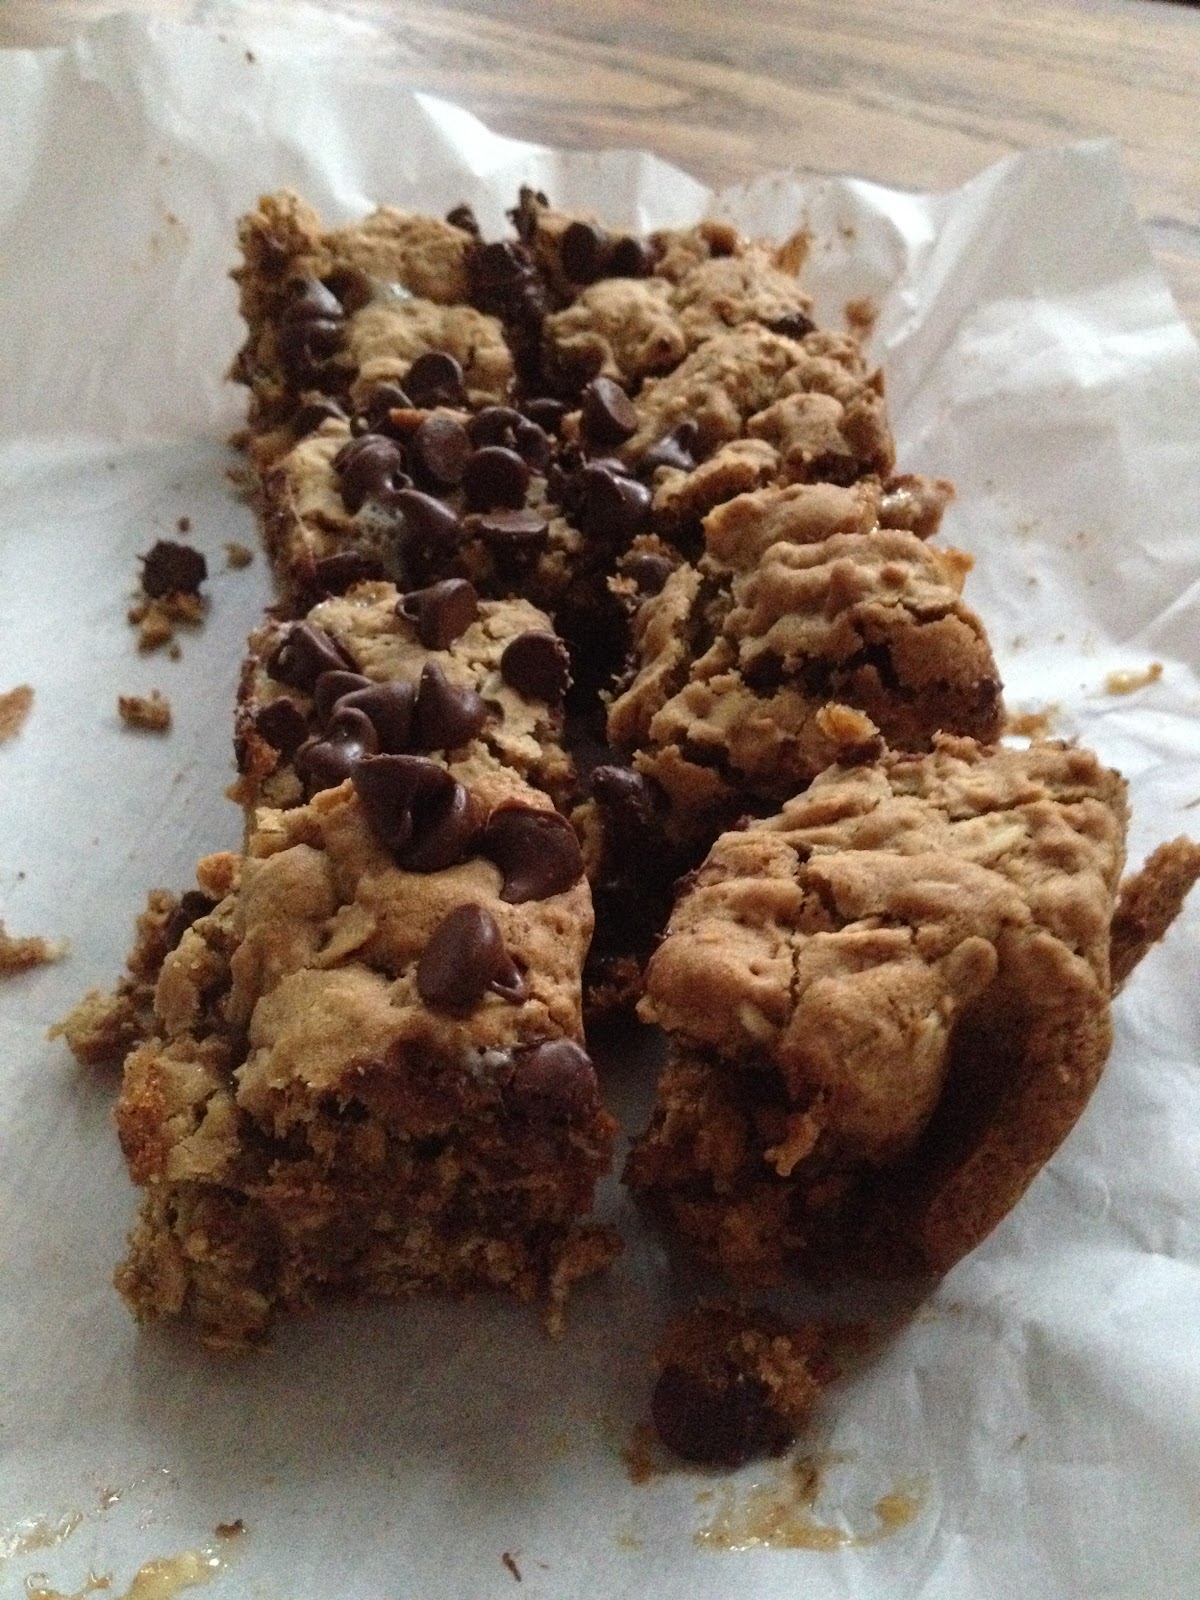
I know you could technically roast marshmallows over a gas stove flame but you could also make these s'mores bars to capture the camp roasting goodness in the city. Or your home. Or in the winter. For-e-ver. These are basically chocolate chip oatmeal cookies with marshmallows in a bar. Totally acceptable for breakfast.


Are you ready for the life hack? I never remember to take butter out to soften. This means I stick it in the microwave and melt the stick instead. It works, clearly, but it's not the best way to get creamy butter and sugar base. So instead, I saw this video on how to quickly soften your butter while also taking out some aggression. Use a rolling pin and smoosh the butter! And by smoosh, I mean whack. It doesn't make the butter ooze everywhere, you could put it in a bag if you're concerned, but I rotated the stick as I hit the butter so it didn't get completely flat and evenly softened. Success!

Once you have your butter ready, cream it with the sugars using a hand mixer. The dry ingredients (excluding oats) are mixed in a separate bowl and then added to the sugar-butter goodness. It's gettin' thick! Once the dry and wet ingredients are well incorporated, fold in the oats. This is where your biceps go to work.

In a square pan, dump half of the oats mixture and flatten. Next, add a layer of chocolate chips. Be generous! Then, add a layer of marshmallows.

The second half of the oats mixture goes on top of the chocolate and mallow layer. This makes icing a cake look so darn easy. I found it easiest to just throw down a blob of batter and flatten rather than try and spread it. Top with another layer of chocolate, because we can.

Bake for awhile. Okay, not forever, just until everything is cooked through. It's hard to tell because this is so dense but use a chopstick to test the middle.

I let these cool and set overnight before trying to slice and share, the gooey warm marshmallow could get messy but oh so delicious. Like I said, completely acceptable for breakfast.

Recipe
from Spoon Fork Bacon

  • 1 2/3 cups of flour
  • 1 teaspoon baking powder
  • 1/2 teaspoon salt
  • 1/2 teaspoon cinnamon
  • 1/4 teaspoon nutmeg
  • 1 stick unsalted butter, softened (or beaten with a rolling pin)
  • 1 cup brown sugar
  • 1/4 cup granulated sugar
  • 2 eggs
  • 1 teaspoon vanilla extract
  • 2 1/2 cups oats
  • 8 ounces of chocolate, divided
  • 6 ounces mini marshmallows (okay, I didn't measure this)
  1. Preheat your oven to 350 degrees. Line an 8x8 pan with parchment paper and set aside.
  2. In a small bowl, whisk together the flour, baking powder, salt, cinnamon and nutmeg. Set aside.
  3. In a medium bowl, cream the butter and sugars together until they are smooth. Add the eggs one at a time. Top off with the vanilla.
  4. Add the flour mixture to the butter mixture a little at a time, mixing with an electric mixer on low. This will prevent a dust storm.
  5. Fold in the oats using a rubber spatula.
  6. Press half of the oats mixture into the square pan. Use the rubber spatula to press it into the pan to fill the square shape.
  7. Top with a layer of chocolate chips (I didn't measure this either). Add your layer of marshmallows.
  8. The next part is tricky. Add the remaining oat mixture to the pan. I found this was best achieved by taking a spatula-full at a time and pressing it on top of the marshmallow layer instead of trying to spread it. 
  9. Once that's done, top with another layer of chocolate chips.
  10. Bake for 30 minutes or until firm. Allow to cool before cutting and serving. Totally a breakfast food. 


Wednesday, September 2, 2015

Cherry Ice Cream

We are quickly approaching a difficult juncture: the split between summer and fall. For the fall-fanatics, good news: pumpkin beer is back! For the summer-lovers, good news: pumpkin spice lattes aren't back until after Labor Day! As always happens, this summer went by far too quickly. I never wrote out my official summer bucket list but I feel like not enough beach trips happened and I didn't make it to the cape. But I did make some ice cream, so there's that.

Before the return of cider donuts and pumpkin everything, let's enjoy some homemade ice cream, one more time. To make it extra-summery, let's use some summer fruit: cherries! Apparently these are already becoming a scarce commodity. So sad.

I want to try this ice cream again with Greek yogurt instead of sour cream but we're using a whole lotta thick dairy today. Sour cream, heavy cream and condensed milk are our dairy of choice. Cherries and sugar are simmered with a touch of Amaretto and a split vanilla bean (we're getting fancy). This mixture is then added to our dairy in a large bowl, stirred to pink perfection.

I have mixed feelings about ice cream makers. I'm not sure what is meant to happen when I pour my ice cream base into the frozen bowl of a Kitchen Aid mixer and let it churn. Does it get thicker? Does it look like ice cream? I end up freezing the mix for a day anyways, why can't I just put it directly in the freezer? I probably could but for directions' sake, use your ice cream maker. Or just stick your mix in the freezer and serve the next day.

Regardless, this is very creamy. You can taste the sour cream but not in a weird way, in a surprisingly tart manner.

Recipe
from Not Without Salt
  • 1 pound pitted cherries, cut into pieces
  • 1 vanilla bean, split and scraped
  • 1 cup of sugar
  • Juice from 1 lemon
  • Pinch of salt
  • 2 Tablespoons of Amaretto liquor
  • 1 can condensed sweetened milk
  • 1 16 ounce container of sour cream
  • 1 cup heavy cream
  1. I used a cherry pitter aka: cherry guiatine to remove the pits. Place the pitted/diced cherries in a saucepan with the vanilla bean, sugar, lemon juice and salt. Simmer over medium heat and bring a low boil for 10 minutes.
  2. After 10 minutes, remove from heat and stir in the Amaretto. Also remove the vanilla bean pod. Set aside to cool.
  3. While the fruit is cooling, combine the condensed milk, sour cream and heavy cream in a large bowl. I found it easiest to use a whisk for this process. 
  4. Once the fruit mixture has cooled, stir into the milk-sour cream-heavy cream mixture. This is where you get a pretty pink yogurt feel.
  5. Now, if you're feeling adventurous, pour into a container and freeze. If you have an ice cream maker, churn the mixture according to the machine's instructions and freeze overnight. I found that's how long it took to set completely but you could serve sooner if you'd like.

Tuesday, August 25, 2015

Pad Thai Zoodles

Do you have a go-to menu choice when eating out? I feel like I'm always torn between trying something new and trying something that I know I'll enjoy or won't cook at home. Like steak or burgers. When I go to Thai restaurants, I almost always order Pad Thai. Drunken Noodles sounds awesome but Pad Thai can't go wrong. I've found that there are a number of different ways to prepare Pad Thai though.

I came across this recipe via Pinterest when I was trying to learn how to use a spiralizer I got for my birthday. It seems simple enough but I wanted to make sure I was getting the maximum spiral out of it. This blogger tested a few different ways of creating zoodles (n. zucchini noodles) but I just went with a hand-held spiralizer.

I didn't have all of the ingredients for the noodle seasoning or sauce but I think it still came out pretty well. Definitely need to figure out how to keep cilantro readily available in my kitchen, just in case. If you don't have a spiralizer, you could chop up squash into small strips or you could use this sauce on regular noodles too.

The zoodles are cooked first, simply in olive oil for a couple minutes. I was concerned I had overcooked them but again, still tasted good to me! The same pan is used for the garlic sauteing and then red bell pepper cooking. The zoodles have been removed at this point and placed to the side.

In a separate bowl, the sauce is made by combining ketchup, brown sugar, fish oil, vinegar and chili powder (I think I actually used paprika). This will be added last. Once the peppers have cooked for a couple minutes, add the zoodles back in. Lastly, douse everything with the sauce and add some peanuts for extra crunch. Everything simmers for 5-10  minutes to really absorb the flavors.

In the original recipe, there are some green onions, cilantro and shrimp involved. It sounds great! And would really dress this dish up. But if you're looking to keep it simple or veggie, this came out great too! It has some kick to it from the paprika/chili powder but I wouldn't say it's classic Pad Thai which I don't really think of as being red sauce based. Thoughts?


Recipe
  • 1 medium zucchini, spiraled
  • 1 medium yellow squash, spiraled
  • 2 Tablespoon olive oil, divided
  • 1 red bell pepper, chopped
  • 2 cloves of garlic, minced
  • 2 Tablespoons white vinegar
  • 2 Tablespoons fish oil
  • 3 Tablespoons ketchup
  • 1 teaspoon brown sugar
  • 1/3 teaspoon paprika (or chili powder)
  • 1/4 cup peanuts
  1. Using your preferred spiralizer or lots of chopping, spiral two medium squash (I used one zucchini and one yellow squash).
  2. Heat a tablespoon of olive oil in a medium skillet and cook the zoodles for 2-3 minutes. 
  3. Meanwhile, chop up the bell pepper and garlic. 
  4. Remove the zoodles and set aside on a paper towel to absorb extra water. Wipe out the pan and heat the second tablespoon of olive oil. Add the garlic and cook until fragrant. 
  5. Next, add the chopped bell pepper to the pan with the garlic.
  6. In a small bowl, combine the vinegar, fish oil, ketchup, brown sugar and spice. Whisk with a fork to combine. 
  7. Add the zoodles back to the pan and pour the sauce over the bell pepper and garlic in the pan. Simmer for 1-2 minutes.
  8. Continue to simmer to let the flavors combine. Add the peanuts and cook for 3 more minutes.
  9. Serve hot! 


Wednesday, August 12, 2015

Pork Tenderloin with Rhubarb Chutney

I've spent a lot of time baking with rhubarb. Or at least it feels like a long time, there's a pretty exhaustive list of treats including jam, cake, ice cream, drinks and pie. That's a lot, possibly the most used baking ingredient on here. But what else is rhubarb able to become? Must it be cornered in baking or can we expand its uses to cooking? Ask and ye shall receive!

I found this recipe while scouring the internet for rhubarb uses other than sweets. This is an intensive recipe, lots of moving pieces. We've got a spice rub, a chutney AND a sauce. Lordy lordy. But the good news is, you could divide these up. You could just make the rub if you don't like rhubarb (you can go now...). Or you could just make the chutney and a pre-marinated pork loin.

In this case, we're pulling out all the stops. I made the chutney first and kept it for a couple days before getting to the sauce and pork loin. We're chopping up quite a bit of rhubarb and onion for the chutney. These are sauteed with olive oil for about 2 minutes until liquid goodness is added. Liquid goodness comes in the form of some orange juice, balsamic, lime zest, and agave nectar. All the things. Boil all of these and then reduce to a simmer, leaving uncovered for 30 minutes.

This is a great time to prep your pork loin. In a small bowl, add all of the spices: rosemary, garlic powder, salt, pepper, cumin, chili powder and for some sweetness, cinnamon and ginger. Mix well and rub on the pork loin. Allow to sit for 20 minutes before cooking (aka: while the chutney cooks).

Once your oven has reached 350, cook the pork loin until cooked through or a meat thermometer reaches 155. No pink here! This will likely take 45 minutes depending on your oven strength and meat thickness.

While the meat cooks and the chutney cools, it's time to whip up the glaze. Chop up some onions and garlic, sauteing in a sauce pan with olive oil. Once the onions start to become translucent, add the brown sugar and rum. Continue cooking for 2 minutes before adding chicken stock and a dash of cinnamon. You can also add some hot sauce if you want a little kick. Bring the liquid to a boil and then reduce the heat so the mixture will thicken. The volume should decrease by half. I ended up with more of a sauce than a glaze, not very thick but still delicious. Allow this to cool for at least 10 minutes before serving.

Bring all the pieces together by pouring the glaze over the pork and serve with the chutney. I found this pretty delicious, if I do say so myself. You can also grill the pork loin instead of using the oven but I have an oven, not so much a grill.


Recipe
Spice Rub and Pork Loin

  • 2 lb. pork loin
  • 1/2 teaspoon salt
  • 1/4 teaspoon pepper
  • 2 Tablespoon rosemary
  • 2 teaspoon garlic powder
  • 2 teaspoon cumin
  • 1 teaspoon chili powder
  • 1/2 teaspoon ground cinnamon
  • 1 teaspoon ginger
  1. Combine spice ingredients in a small bowl. Make sure to evenly mix the ingredients.
  2. Rub the spices over the pork loin and allow to sit for 20 minutes before cooking (good for preheating time or chutney-making).
  3. Preheat the oven to 350. Once ready, cook the pork loin through with the meat thermometer registering 155.
Rhubarb Chutney
  • 2 cups rhubarb, chopped
  • 1/3 cup red onion, chopped
  • 1 Tablespoon olive oil (for sauteing)
  • 1/4 cup orange juice
  • 2 Tablespoons balsamic vinegar
  • 1/4 teaspoon lime zest
  • 2 Tablespoons agave nectar
  1. Heat the olive oil in a small sauce pan. Once heated, add the rhubarb and onion. Saute for 2 minutes.
  2. Add the remaining ingredients and bring to a boil. Reduce heat to a simmer and uncovered for 30 minutes or until rhubarb is tender.
  3. Once the rhubarb is tender, remove from heat and set aside to cool slightly. You want to serve it warm though.
Rum Glaze
  • 1 Tablespoon olive oil (for sauteing)
  • 1/2 cup of onion, chopped
  • 2 cloves of garlic, minced
  • 1/4 cup brown sugar
  • 1 cup dark rum
  • 1 cup chicken stock
  • Dash of cinnamon
  • Hot sauce (optional 2 teaspoons)
  1. In a small saucepan, heat the olive oil and add the onion and garlic. Saute until the onions are translucent.
  2. Add the sugar and rum to the onions. Heat for 2 minutes before adding the remaining ingredients.
  3. Bring to a boil and then reduce heat to a simmer. Simmer for 25-30 minutes until the volume is reduced by half. You want the mixture to thicken into more of a glaze.
  4. Once the volume has reduced, remove from heat to cool and thicken more.
  5. Serve over the pork loin, adding the chutney before serving.